VS Code · Live Scan · AI Auto-Fix

Scan and Fix Security Vulnerabilities
Without Leaving the Editor.

AquilaX Live Scan gives developers instant, single-file security analysis directly in VS Code — powered by 32 security scanners and an AI engine that generates context-aware fixes in seconds.

Overview

Security Analysis & Remediation
at Developer Speed.

Live Scan is a real-time, single-file security analysis feature built into the AquilaX VS Code extension. Instead of waiting for a full repository scan, developers instantly scan the file they are actively working on and receive AI-powered fixes without leaving the editor.

Real-Time Scanning

Scan the file you are working on right now. No repository-wide scan required — results arrive within seconds.

🛡️

Comprehensive Ruleset

Checks against OWASP Top 10, CWE classifications, and language-specific security patterns across all major languages.

🤖

AI Auto-Fix

One click triggers the AI engine. It reads the vulnerable code in context and generates a corrected replacement — not just advice.

🔍

In-Editor Navigation

Click any finding to jump directly to the vulnerable line. Highlights make the problem immediately visible before any fix is applied.

Accept or Revert

Review the AI-applied fix highlighted in green. Accept to keep it permanently, or revert to restore the original code instantly.

🎯

Zero Context Switching

The entire scan → review → fix → accept workflow happens inside VS Code. No browser, no dashboard, no interruption.

Step-by-Step

How Live Scan Works:
From Click to Fix.

The entire flow — trigger, scan, review, fix, accept — takes place inside VS Code without touching a browser or switching tools.

1

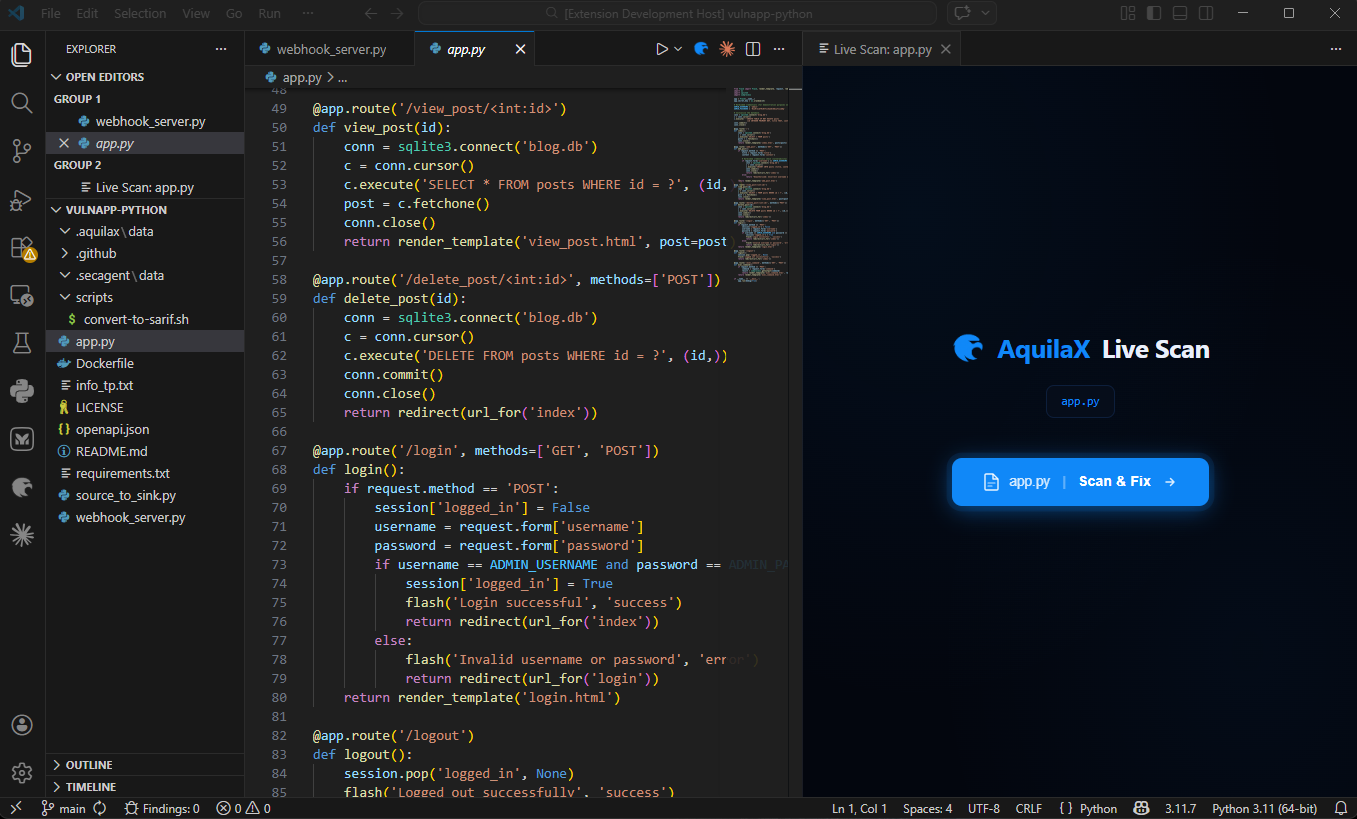
Click the AquilaX Scan Icon

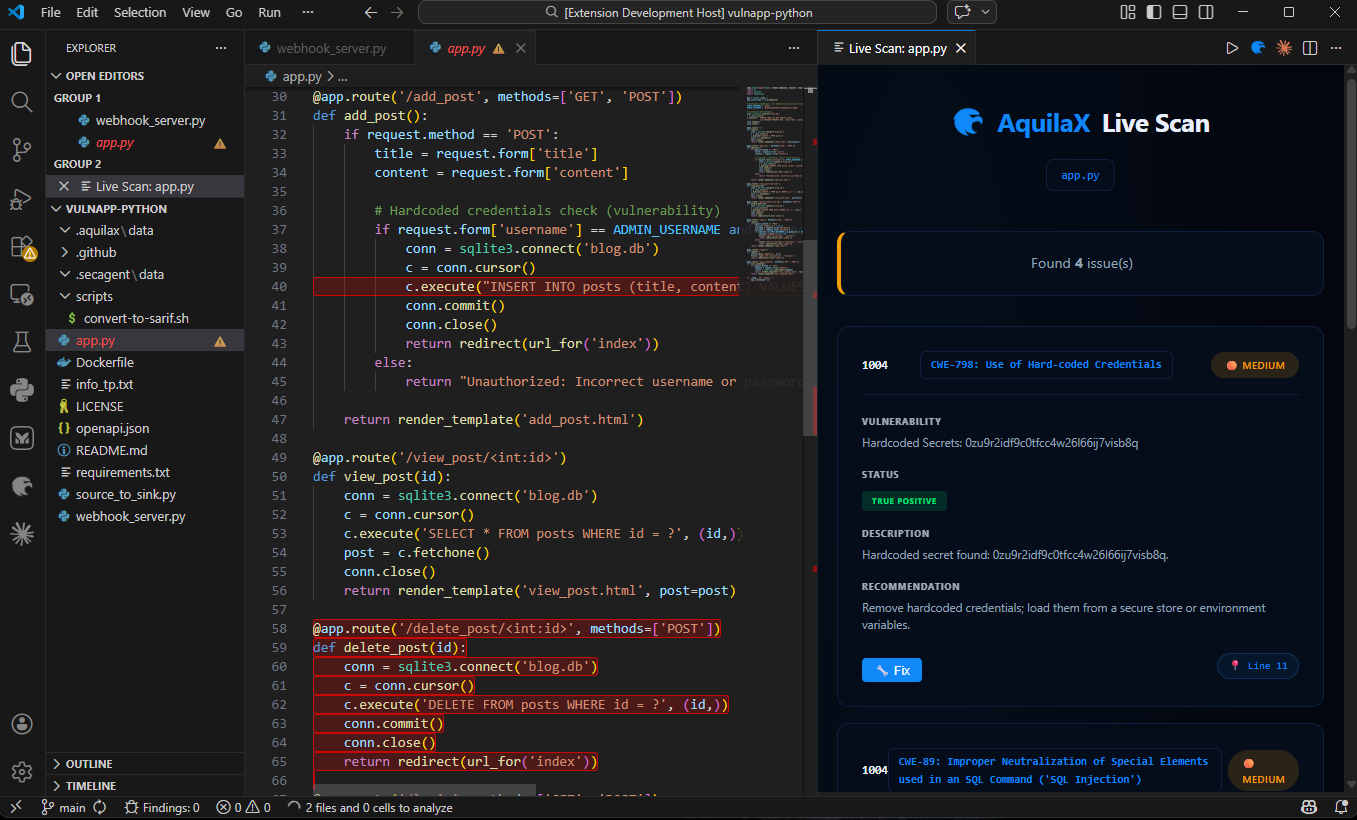
A dedicated AquilaX scan icon appears in the top-right corner of the VS Code editor title bar whenever a file is open. Clicking it opens the Live Scan panel and immediately begins scanning the active file.

VS Code editor title bar with the AquilaX scan icon button
The AquilaX icon in the VS Code editor title bar — one click starts the live scan.
2

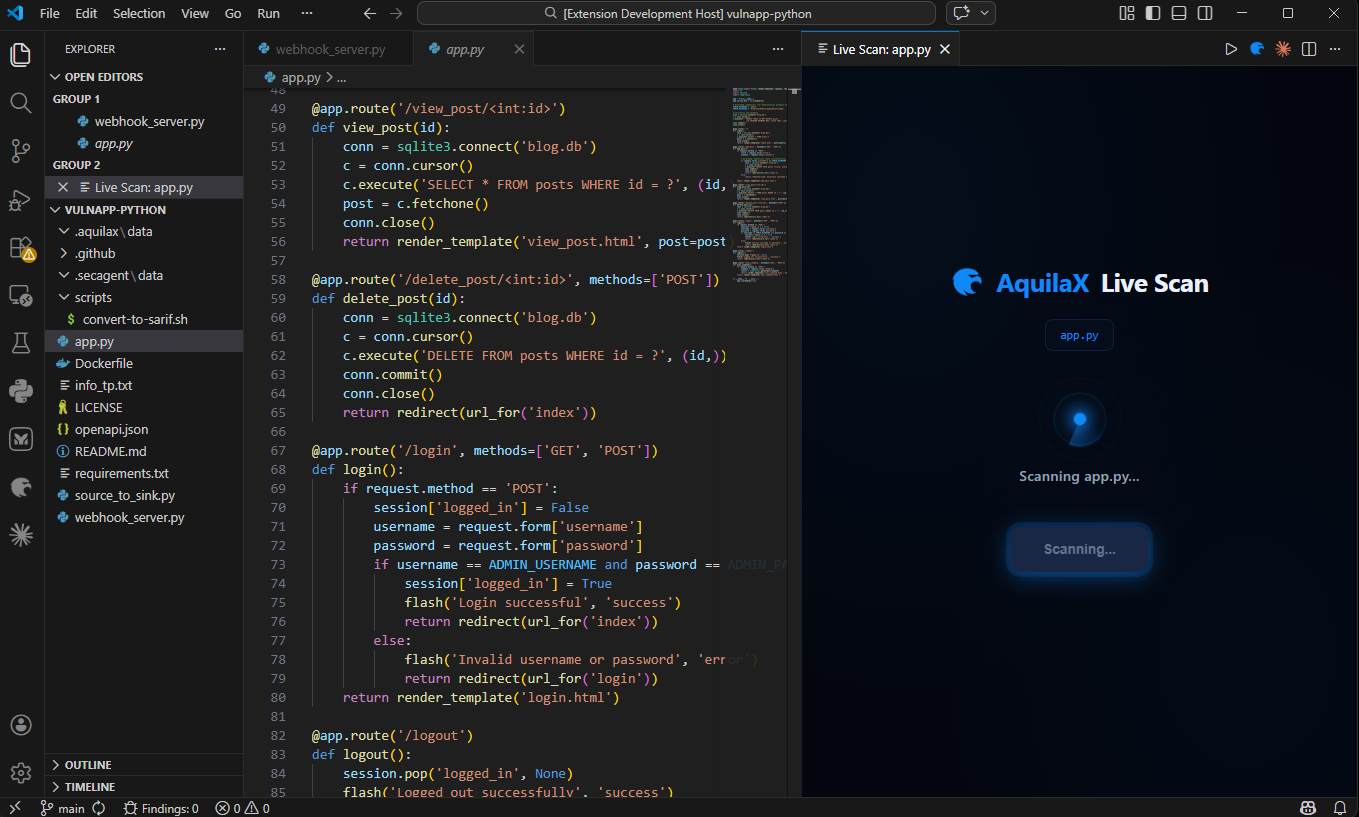
File Analysis Begins

The extension sends the current file's code to the AquilaX security engine, which analyses it against a comprehensive ruleset covering OWASP Top 10 vulnerabilities, CWE classifications, and language-specific security patterns.

Live Scan panel with animated radar spinner showing the file being scanned
The Live Scan panel displays an animated radar spinner while the file is being analysed.
3

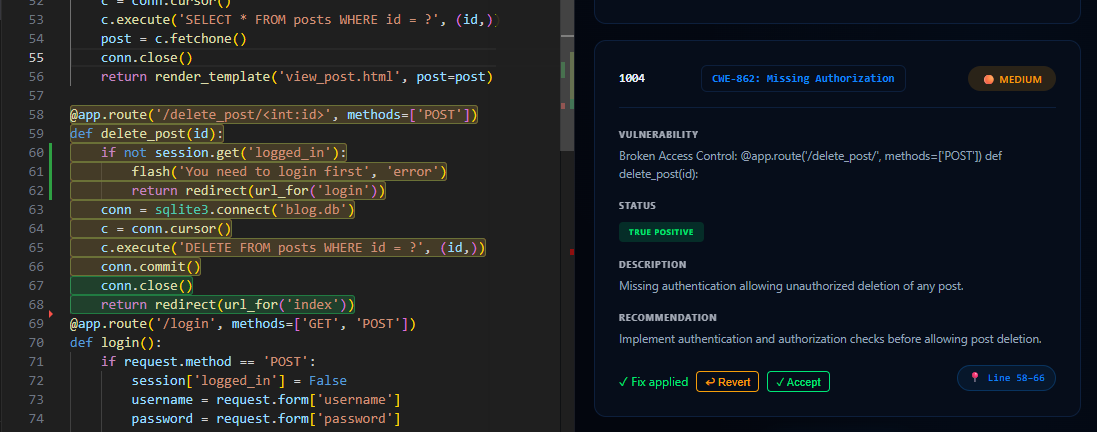
Review the Finding Cards

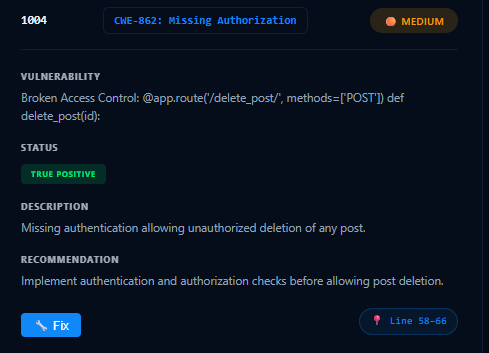
Once complete, the panel displays a list of finding cards — one per detected vulnerability. Each card shows the Rule ID, CWE badge, severity badge (CRITICAL / HIGH / MEDIUM / LOW), vulnerability type, verification status, description, recommendation, and the exact line number in the file.

Live Scan panel displaying multiple finding cards with severity and CWE badges
Each finding card surfaces everything a developer needs — severity, CWE, description, and a direct line reference.
Anatomy of a Finding Card
sql-injection-001 CWE-89 CRITICAL True Positive
SQL Injection
Description: User-controlled input is concatenated directly into a SQL query, allowing an attacker to alter the query's logic, exfiltrate data, or modify the database.
Recommendation: Use parameterised queries or a prepared statement. Never build SQL strings with unsanitised user input.
📍 Line 42 — user_query.py
4

Navigate to the Vulnerable Line

Clicking anywhere on a finding card (outside the action buttons) jumps to the vulnerable line in the editor and highlights it, making it immediately visible in context. This helps developers understand exactly what code is problematic before applying any fix.

5

Trigger the AI Auto-Fix

Each finding card includes a Fix button. Clicking it triggers the AI auto-fix engine. The extension collects the vulnerable code along with surrounding context (10 lines above and below), detects the file's programming language automatically, and constructs a security-focused AI prompt including the vulnerability type, CWE, impact, and strict guardrails.

Finding card with the AI Fix button ready to be clicked
The Fix button on each finding card triggers the AI auto-fix engine.
Step 01

Context Collection

10 lines above and below the vulnerable code are collected to give the AI full function-level context.

Step 02

Language Detection

The file's programming language is detected automatically — no manual configuration needed.

Step 03

Prompt Construction

A security-focused prompt is built with the vulnerability type, CWE, impact, and strict guardrails to ensure a safe fix.

Step 04

AI Fix Request

The request is sent to the AquilaX AI service. While generating, an animated "AI is fixing..." indicator is shown on the card.

Step 05

Fix Applied

The corrected code is automatically applied to the file and the changed lines are highlighted in green for review.

6

Accept or Revert the Fix

Once the fix is ready, it is automatically applied to the file and the changed lines are highlighted in green. The finding card updates to show two action buttons: Accept — permanently keeps the fix, removes the finding from the list, and clears the highlight; Revert — undoes the fix and restores the original code, bringing the finding back to its original state.

VS Code editor showing green-highlighted lines where the AI auto-fix was applied
Green-highlighted lines show exactly what the AI changed — review before accepting.
Fix Applied — Accept or Revert
sql-injection-001 CWE-89 CRITICAL
SQL Injection
✅ AI fix applied — review the highlighted changes in the editor.
Panel Walkthrough

The Live Scan Panel
in Detail.

Every part of the Live Scan panel is designed to keep developers in flow — from the first scan trigger to the final accepted fix.

  • 🎯

    One-Click Trigger

    The AquilaX icon in the editor title bar is always reachable. No menus, no commands — one click starts the scan for the current file.

  • 📡

    Animated Scanning State

    While the scan runs, a radar spinner animation with the filename keeps the developer informed. Scans typically complete within seconds.

  • 📋

    Structured Finding Cards

    Each finding is presented as a structured card with Rule ID, CWE, severity, type, status, description, recommendation, and line reference — everything needed without opening a browser.

  • 🔗

    Direct Line Navigation

    Clicking a card body jumps to the exact vulnerable line in the editor. The line is highlighted so the developer sees it immediately in context.

  • 🤖

    AI Fix with Live Indicator

    While the AI is generating a fix, an animated "AI is fixing..." indicator replaces the Fix button — giving real-time feedback with no spinner fatigue.

The full AquilaX Live Scan panel inside VS Code
The AquilaX Live Scan panel — scan, review, and fix from a single unified view.
Questions Answered

Live Scan & AI Auto-Fix
Frequently Asked Questions.

Common questions from developers using or evaluating the AquilaX VS Code extension.

Does Live Scan analyse the entire repository?
No — Live Scan is intentionally a single-file feature. It analyses exactly the file you have open and active in the editor. For full repository coverage, use the AquilaX organisation scan which runs all 32 scanners across every file in parallel.
Which programming languages does Live Scan support?
Live Scan automatically detects the language of the open file and applies language-specific security rules. Supported languages include Python, JavaScript, TypeScript, Java, Go, PHP, Ruby, C/C++, C#, Kotlin, Swift, Rust, and more. The AI auto-fix engine generates fixes in the same language without any configuration.
What security standards does the scan check against?
The AquilaX security engine checks against OWASP Top 10 vulnerabilities, CWE (Common Weakness Enumeration) classifications, and a comprehensive library of language-specific security patterns. Every finding card surfaces the relevant CWE identifier so developers have direct context.
How does the AI generate a fix without breaking the rest of the code?
The AI auto-fix engine collects 10 lines of surrounding context above and below the vulnerable line before generating the fix. This context — combined with a security-focused prompt that includes the vulnerability type, CWE, and strict guardrails — allows the AI to produce a targeted, compilable fix that preserves the surrounding logic rather than replacing entire functions.
Can I undo an AI fix if I do not like it?
Yes. After the AI applies a fix, two buttons appear on the finding card: Accept and Revert. Clicking Revert immediately undoes the change and restores your original code exactly as it was, with the finding reappearing in its original state. No changes are permanent until you click Accept.
Is my code sent to an external server during Live Scan?
The current file's code is sent to the AquilaX security engine for analysis. AquilaX offers both a SaaS cloud option and an on-premises deployment option (Docker / Kubernetes / Helm) for teams with strict data residency requirements, ensuring code never leaves your infrastructure.
Do I need to install anything beyond the VS Code extension?
No additional tooling is required. Install the AquilaX VS Code extension from the marketplace, authorise it with your AquilaX account, and the Live Scan icon will appear in the editor title bar immediately. No CLI tools, Docker containers, or config files are needed.
Start Scanning Today

Detect and Fix Vulnerabilities
Without Leaving VS Code.

Install the AquilaX VS Code extension, run your first live scan in under a minute, and let the AI fix engine handle the remediation — so you can stay focused on shipping features.

No credit card required 14-day Ultimate trial On-premises available Setup in <1 minute